
Securely Connect Your Industrial Edge: A Guide to Creating a Secure Tunnel Using Cloudflare
When you need to access your resources remotely, you may think that using a VPN (virtual private network) is a good option. A VPN creates a secure and encrypted connection between your device and a remote server, and allows you to access your resources as if you were on the same network. However, VPNs have many limitations and risks, such as being prone to hacking, leaking your data, or slowing down your network performance. A bad actor need only exploit one poorly configured end point to gain access to the whole network. A better alternative is to use a secure tunnel based on the zero trust model, which offers many benefits over VPNs.
A secure tunnel based on the zero trust model works by establishing a direct and encrypted connection between your device and your resource, effectively creating a gate keeper at each individual endpoint / service. The secure tunnel verifies and authorizes every request before granting access and assumes that no user, device, or network can be trusted by default. The secure tunnel also reduces the attack surface, limits the impact of breaches, and enables continuous monitoring and improvement of security posture. End points are configured by default without access. Authorisation criteria have to be setup individually for every end point.
Some of the advantages of using a secure tunnel based on the zero trust model are:
Enhanced security: A secure tunnel protects your data and credentials from being intercepted or compromised by hackers, malicious actors, or third parties.
Improved performance: A secure tunnel optimizes your connection speed and stability by using the shortest and fastest route between your device and your resource. A secure tunnel also does not consume much bandwidth or CPU resources, and does not interfere with other network protocols or devices.
Simplified management: A secure tunnel is easy to set up and maintain, and does not require any hardware or software installation on your device. You can also use various identity providers and access policies to manage your access to your resources.
There are various options available in the market, one such solution that we regularly use at ThetaPhi is Cloudflare Tunnels. The setup is relatively easy and there are no costs associated with it (depending on application). We found it particularly useful for establishing secure and reliable connections to Industrial Management server and Industrial Edge Devices for remote monitoring and support. So keeping with out motto of sharing actionable information based on our experience, in this post I will share how to create a secure tunnel to your industrial edge management server using a Cloudflare Tunnel.
Let us first have a quick look at how the secure tunnel works: When you setup a tunnel using Cloudflare, the Cloudflare server creates an encrypted and secure connection to a client deployed on the network. The client only accepts data from and sends data to the Cloudflare server. All incoming traffic from the internet is handled by Cloudflare inline with the configured access policies. If the user accessing the resource has access, the request is forwarded to the client along with the details of the desired endpoint. The client forwards the request to the specified endpoint and passes the response back to Cloudflare. Cloudflare then passes the response back to the requesting user:

What you will need to set this up:
A registered domain for DNS routing over the internet
A Cloudflare account
A high availability endpoint (accessible over the internet) to run your tunnel client on (I will use a raspberry pi for this tutorial).
You can get domain names at very low prices but do make sure that you can update the
name servers for the domain once it’s setup. Some service providers do not allow this
(for example WIX). For the purposes of this tutorial I got one from google domains (www.thetaphi.dev).
Once the domain registration is complete, go to Cloudflare and signup for a new account. Login to your Cloudflare account and from your dashboard under websites click "Add new site".
Enter your newly registered domain name click continue.

You can select the plan that is appropriate for you but for the purposes of this example I will select Free package and click continue.
Cloudflare searches the DNS records and shows the details for the public IPs assigned to your domain. To use Cloudflare you will need to update the Nameservers for your domain to use Cloudflare's nameservers. Click continue and under “Complete your nameserver setup” copy the provided Nameservers:

Paste the nameserver in your domain’s DNS settings:

Click save and then click Switch to these settings in the top banner (for google domains). The nameserver update can take a while to get registered. Once it is registered you will get an email to confirm that the nameservers have been updated. Now any request to your domain will be handled by Cloudflare.
To setup a tunnel; go to your Cloudflare account and click on your website. Select “Access” and click “Launch Zero Trust”:

From the zero trust dashboard go to "Access" and select "Tunnels":

Click create a tunnel. Give your tunnel a name and click save tunnel:

With the tunnel now created on Cloudflare we need to setup a client that this tunnel will connect to. SSH into your client and run the specified commands provided for your selected end point in "Install and run connector". As I am using a Raspberry Pi, I will run the commands provided for Debian (arm-64-bit). On successful completion you will see the following on your command prompt:

You can check to make sure the service is running:

In you Cloudflare account you should also see the connector as connected:

We can now start routing traffic to our required endpoints using the tunnel. In the snapshot below I am routing traffic from www.iem.thetaphi.dev to my industrial edge management server running on my local network:

As the industrial edge management server only accepts traffic over HTTPs, we must configure our service accordingly. However since I am using self signed certificates for edge management server, I will disable TLS verification under advanced settings:

Click save tunnel to finish the setup. In your Cloudflare account under Access > Tunnels you should now see your newly created tunnel. Let us test the hostname by going to https://www.iem.thetaphi.dev:

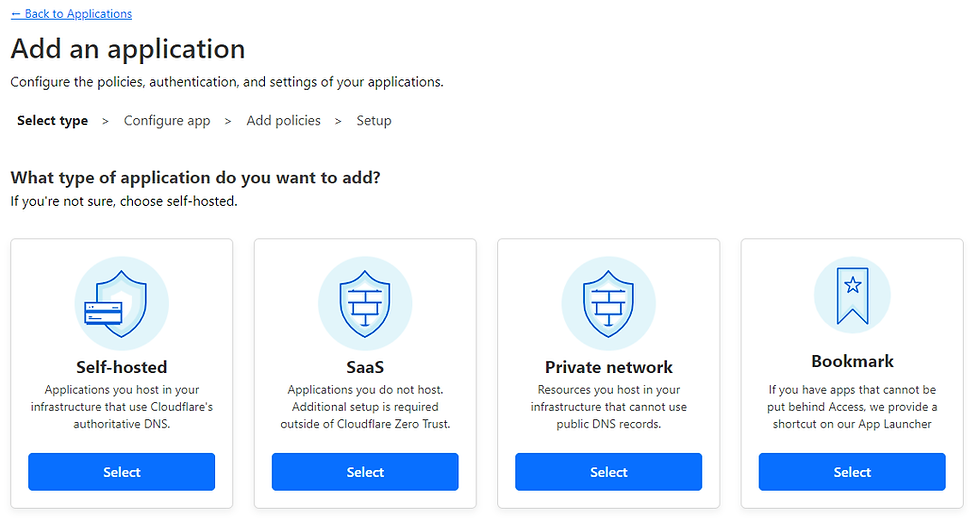
This end point is now exposed to the public. While it is protected by the authentication service provided by the industrial edge management server you should still add security using Cloudflare’s zero trust access mechanism. Let us create an application to our configured endpoint for the IEM. In the zero trust dashboard under Access click Applications and then click "Add an application". Select self hosted:
Give the application a name and configure the endpoint:

You can select the identity providers to use for the application. I have setup authentication using google (for convenience) which I will be using for my application but you can use a One Time PIN.

On clicking next you be asked to Add a policy for the application. This is where you define the rules for access to the end point. You can add multiple policies for the application to allow and deny certain types of traffic. You can also setup and include Access Groups:

The overall policy is determined by the individual rules applied. So the Policy shown in the snapshot could be read as:
Allow access if the user is NOT part or the group “Customers“ AND IS part of group “Admin” AND IS signing in using Google’s OAuth service with an email address ending in @thetaphi.co.uk.
Click next and then click add application. You should now have a configured application for your end point:

If I now try to access the endpoint I am greeted by the following login screen:

To access the application I must sign in using Google’s authentication service and my email address must end with the company's domain name. The Google authentication service we are using for Cloudflare is provided by an application deployed on the company’s Google Cloud thus securing it further. Leave a comment if you are interested in how this was setup and we will do a post on how to configure yours. You can still secure the end point using a One Time Pin in which case an access pin is sent to the email address provided for signing in.
You can add additional services to your tunnel by going into the configurations for your tunnel and adding additional routes under the "Public Hostname" tab and setting up an application with the required access policy. At ThetaPhi, we have also setup access to an the industrial edge management device and a NodeRed instance running on the network using a similar access policy to allow developers to login remotely for monitoring, system simulation and testing purposes and it has greatly improved productivity.
If you prefer not to expose your endpoints to internet you can also create a secure tunnel to the endpoints on your network and protect them using Zero Trust model with the same level of control over who has access to these endpoint. In such cases the user would connect to the service using Cloudflare's WARP client (much like a VPN). The procedure for setting it up and securing it is a whole other post so let us know if you are interested and we'll publish a post on how we have setup access to our company's internal network using Cloudflare and WARP client.
This was a quick setup guide, there are tons of configuration options available for applications and security on Cloudflare that you should definitely checkout. While VPN has it's uses, Zero Trust is more secure and robust for granting secure connections to services running on your network. I hope you found this post to be informative and useful.
Comments